Original Tutorial
http://catlikecoding.com/unity/tutorials/runner/
My version of the game (Version Log)
http://www.hansadrian.com/Stuff/Endless%20Runner%20Tutorial/build.html
GitHub Gist (for full code files)
https://gist.github.com/HansNewbie/10005219/0bdb11657b44c17a8f5b17fc32d1f11d47ff1b62
Completed Project Files (V0.6.1)
Buy this on Selz Selz powering ecommerce websites
For version 0.6, I added simple background music. As I was thinking it could be improved, I made V0.6.1 where you can toggle the music on or off, as well as added background for high score to make it readable.
I would like to start by saying that this will be the last update to the tutorial series. Thank you very much for those of you who has been following the series as well as those who have bought the completed project files. This game is practically complete; you just need to change the graphic and sound assets and you are ready to get your own endless runner game out. As such, I don't have anymore improvements that I can contribute to the original tutorial. Also, I have other projects (or games) that I would like to put my hands on. This update takes a long time because I have not had the time or energy to do so. Hopefully this extension tutorials have been useful to you. Alright, let's go to the tutorial!
For V0.6, I added a background music - a simple one, made with soundation.com studio - so that the game is not that boring. Adding a music is easy. Drag the music file into the scene, and there you have your music playing. Now, the music is 3D sound, meaning its position to the camera is important: the further the sound is from the camera, the softer it is. I am not sure if there is spatial surround sound in Unity, but if there is, sound placement becomes even more important because it will sound as if it comes from such position with respect to the camera (imagine the sound is positioned left back of camera, supporting speakers or headphones can make such effect). The music object also needs to be fixed in relation to the camera as our camera moves in the game. As such, drag it to the camera to set it as child of the camera. It will be like the picture below.
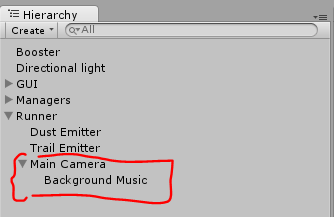
x = 0, y = 0, z = 0 to its position. Then, we fine tune the position so that it is not too loud but not too soft either. I imagine if there is 3D sound effect from the speaker, I would like background sound to come from behind me. Thus, I drag the music object to further from the camera. Test the game repeatedly to ensure it is not too loud nor too soft. I use the value x = 0 (duh), y = -2.206596 and z = -7.997408. Done!Wait! I was thinking, some people may not want to play with background music. So, let's make a sound control! I am calling it V0.6.1. I added high score background as well in the end since it is quick but make the game looks much nicer!
For sound control, since I was on Unity 4.3 with no easy UI object, I just use simple images that can be pressed to set music on or off. If you would like the images I use, you can get it from the complete game files as with the link at the start of the post. Create a new script name
SpeakerToggleControl.cs and fill it up with this:using UnityEngine;
using System.Collections;
public class SpeakerToggleControl : MonoBehaviour {
private bool soundStatus;
public Texture speakerOn;
public Texture speakerOff;
private enum BgmStatus { OFF = 0, ON = 1};
void Start() {
if (PlayerPrefs.HasKey("BgmStatus")) {
if (PlayerPrefs.GetInt("BgmStatus") == (int) BgmStatus.ON) {
soundStatus = true;
SetAudioListener(true);
}
else {
soundStatus = false;
SetAudioListener(false);
}
}
else {
soundStatus = true;
SetAudioListener(true);
SaveBgmStatus(BgmStatus.ON);
}
GameEventManager.GameStart += GameStart;
GameEventManager.GamePause += GamePause;
GameEventManager.GameResume += GameResume;
}
void OnMouseUp() {
if (soundStatus)
{
SetAudioListener(false);
}
else
{
SetAudioListener(true);
}
soundStatus = !soundStatus;
SaveBgmStatus(soundStatus);
}
void SetAudioListener(bool status) {
if (status) {
AudioListener.pause = false;
AudioListener.volume = 1;
guiTexture.texture = speakerOn;
}
else {
AudioListener.pause = true;
AudioListener.volume = 0;
guiTexture.texture = speakerOff;
}
}
void SaveBgmStatus(bool status) {
if (status) {
PlayerPrefs.SetInt("BgmStatus", (int) BgmStatus.ON);
}
else {
PlayerPrefs.SetInt("BgmStatus", (int) BgmStatus.OFF);
}
}
void SaveBgmStatus(BgmStatus status) {
PlayerPrefs.SetInt("BgmStatus", (int) status);
}
void GameStart() {
guiTexture.enabled = false;
}
void GamePause() {
guiTexture.enabled = true;
}
void GameResume() {
guiTexture.enabled = false;
}
}
Create a GUITexture object in the scene. I no longer have Unity 4.3 and am in Unity 4.6 so I am not sure if the option is there. You can do it this way: create an empty object named
Speaker Control Toggle Sign and parent it under GUI. Click it and add component GUITexture (I find it under Rendering>GUITexture). As with old Unity, position of x and y is between 0 to 1 about the screen. We want to put it at the top right, so put value of 1 to both. Attach our new script to the object. Drag the images you want to use to indicate the volume status to the Speaker On and Speaker Off respectively. With this, you may or may not see your volume status in the game since the position (1, 1) indicates the image should be at top right, but the positioning is by bottom right of the image so bottom right of our image is at the top right of the screen (hence it is unseen). To put it within viewport, we need shift it by using pixel inset under GUITexture. Also, the image size should be controlled with GUITexture W and H. For me, I use X = -70, Y = -70, W = 60 and H = 60. If you are using your own image, you can play with the values conveniently by attaching your image to the GUITexture, then open the game view (not playing the game, but click on the "Game" tab with Pacman logo just above the scene view). Now, play with the values while seeing your image inside the viewport. You don't have to empty it afterwards as the script will take care of that for your.Let's talk about the script. It looks a bit complicated since I added function to save the volume option in
PlayerPrefs so player will get the same setting on opening the game the next time. We have two public Texture to define the image to use indicating speaker is on or off. The function SetAudioListener will set the audio setting. AudioListener will change all sound in the game (not only the BGM) so this is just a simple script that cannot differentiate BGM and sound effect, for example. We will pause the AudioListener and set the volume to 0 (I can't remember why I set the volume to 0 but I guess it's my habit to take extra precautionary step). We will also change the texture to off as defined guiTexture.texture = speakerOff. The opposite happens if we set the AudioListener to on. We will save this in PlayerPrefs under the key BgmStatus, and since PlayerPrefs can only take certain value type, we will use int here which we define in the enum so we just need to cast the enum to int, i.e. (int) BgmStatus.ON or off. The rest are pretty much self-explanatory if you have done the original tutorial. soundStatus != soundStatus is used to toggle the sound status - this is a short code for toggling boolean value.Since we would like this to work in Android as well, we have to add a little code in
GUIManager. Have Speaker Toggle Control in GUIManager to handle the GUITexture. Then, we will replace the line in update fromif ((Input.GetButtonDown("Jump")) ||
((Application.platform == RuntimePlatform.Android) && (Input.touchCount > 0 &&
Input.GetTouch(0).phase == TouchPhase.Began))) {
to
if ((Input.GetButtonDown("Jump")) ||
    ((Application.platform == RuntimePlatform.Android) && (Input.touchCount > 0 &&
                                                       Input.GetTouch(0).phase == TouchPhase.Began &&
                                                       !speakerToggleControl.HitTest(Input.GetTouch(0).position)))) {
Here what happens is we test that the touch does not hit the image of the speaker control as hitting so means player is not starting or resuming the game. You can check the full
GUIManager file in this version in the GitHub Gist. We also need to repeat this in GameStateManager so the game will not start if player touches the sound control (try it yourself! You can cross check with GitHub Gist file).Last addition to this version is background for high score. You can get the image I used from the full project files or any squarish background. We will put it into the scene, then put the position the same as
High Scores Text, which in this case is x = 0.5 and y = 0.9. The z of the board must be less than the z of the text so that it is rendered behind the text. My text has z = 1 while the board is z = 0. Leave the sizing of the board as it will be taken care of by the GUIManager script. For the controlling of when to show and hide the board, it is the same as the text so just add a one line to do so after every text control (refer to GitHub Gist to see full code for the script). Under the last line for the method SetHighScoreBoard - which is instance.highScoresText.text = highScoreBoard;, add the followingRect highScoresTextSize = instance.highScoresText.GetScreenRect();
//print(highScoresTextSize);
float highScoresSignWidth = highScoresTextSize.width + 60;
float highScoresSignHeight = highScoresTextSize.height + 40;
// The object position in the scene (x = 0.5, y = 0.9) will be the reference for the rect.
// These position will be treated as 0 of left and top. x goes from left to right and y from top to bottom.
// Hence, the left will be width/2, while top will be height (since the object pivot is bottom left -
// try setting both left and top as 0 to see this) substracted by half of padding (40/2 as of above).
float highScoresSignLeft = -1 * highScoresSignWidth/2;
float highScoresSignTop = -1 * highScoresTextSize.height - 20;
instance.highScoresSign.guiTexture.pixelInset = new Rect(highScoresSignLeft,
highScoresSignTop,
highScoresSignWidth,
highScoresSignHeight);
The 60 under width and 40 under height is the padding between the text and the board. The rest is explained by the comment in the code above.
That's all! Have fun making games!
No comments:
Post a Comment